Home > Miata Tech > Third Generation (NC) Tech > NC Front Bumper Cover Removal
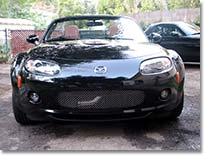
How To Remove the NC's Front Bumper Cover
Submitted by Jerry Standefer
Removal of the NC’s front bumper cover is something that every NC owner will have to do at least once while they own the car (or pay someone else to do it).
Several different aftermarket front bumper covers are available to easily change the look of the car. (Mazdaspeed covers come already painted in your specified factory color.) It must also be partially or completely removed to access, replace, or repair:
- Grille (billet and mesh are available now)
- Headlight, fog, side marker, and signal bulbs
- Fog light bezels (different colors are available)
- Headlight and side marker assemblies
- Radiator
- Horn
- Air inlet tube
Because of this, Mazda has made it relatively simple to remove the front bumper cover. Please notice that I used the word relatively. There are a lot of fasteners - 80 in total - consisting of nuts (4), bolts (22), and screwtype plastic clips/expansion rivets (54). Although the number of fasteners is very high, once you know where everything is, the whole cover can be removed in less than 20 minutes.
Tools and equipment
Here’s what you’ll need to do the job:
- 10 mm socket and ratchet
- Lug wrench
- 2 x jack stands
- Jack
- Wheel chocks
- Large blanket or other soft material
- Phillips screwdriver
- Flat head screwdriver
- Gloves (optional)
- Bowl or tray to hold fasteners
Removal
- Set the parking brake.
- Place chocks behind rear wheels.
- Loosen the lug nuts on both front wheels.
- Jack up the front of the car, one side at a time, and place jack stands under the chassis to support the vehicle. See your owner’s manual for diagrams of the proper jacking points along the frame rail. Ensure to place the jack stands under parts of the chassis that can safely support the weight of the car.
- Remove the front wheels.
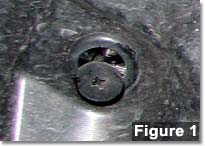
- Locate the plastic clips/expansion rivets that hold the plastic wheel well liners in place. There are 27 on each side. Using a Phillips screwdriver, turn the center expansion pin counterclockwise one quarter of a turn. The expansion pin will rise out (Figure 1). Pull the rivet out. Tighter rivets may need to be pried out with a flat head screwdriver.
- Remove all 54 plastic clips/expansion rivets. The wheel well liner is two separate sections (it looks like three, but the top and rear sections are glued together). The front section of the liner has a few rivets underneath that you can’t see unless you are on your back. Place all of the fasteners in a bowl or tray so you don’t lose them. They will all have to be reinstalled.
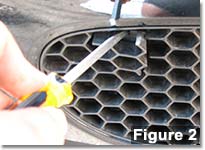
- Remove the hidden bolt covers from the grille by inserting a flat head screwdriver into the slot at the top of each cover and applying pressure down and out away from the grille (Figure 2). Remove the two 10 mm bolts.
- Open the hood. Remove the eight 10 mm bolts that secure the top of the bumper cover.
- From beneath the car, remove the ten 10 mm bolts that secure the bottom of the bumper cover.
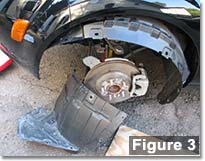
- Remove the small front section of the wheel well liner from both sides. Pull down the large section of the wheel well liner from both sides and let them hang loosely (Figure 3).
- Locate and remove the two 10 mm nuts and one 10 mm bolt (per side) that secure the bumper cover to the fender (Figure 4).

- Locate and unplug the electrical connectors for both fog lights and both side marker lights.
- Place a large blanket or other soft material on the ground. Ensure that it is clean.
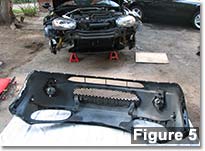
- Carefully pull the bumper cover straight forward to remove from the vehicle, making sure not to damage the two plastic guide pins on both sides where the bumper cover meets the fenders. It should remove easily. (If it does not, push the bumper all the way back, and check for any fasteners that may have been missed or wiring that has not been unplugged.) Carefully set the bumper, paint‐side down, on the blanket or other soft material (Figure 5).
Reinstallation
Follow the removal steps in reverse to reinstall the front bumper cover. Reinstallation is a little more difficult than removal because panels have to be realigned. This is most apparent when reinstalling the wheel well liners. Patience is of utmost importance. If you have trouble reinstalling one of the fasteners, leave it and move to another. As more fasteners are reinstalled, the panels will line up more accurately and that trouble fastener will go in easier.
So why did I do this? I installed a stainless steel mesh grille and a Mazdaspeed cold air intake. It was daunting at first, but now that I’ve done it, I would do it again in a heartbeat. (The cold air intake required some further dismantling of the bumper structure, which I would not want to do again.)
Disclaimer
Please note that these tips and pointers are not reviewed or approved by Mazda Motor Corporation or any other corporation or entity other than the originator. The San Diego Miata Club does not accept any liability for damage or injury as a result of utilizing these tips and pointers. Please use common sense and always remember safety first.
|
