|
|
 |
Home > Miata Tech > First and Second Generation (NA/NB) Tech > NA/NB Shock Replacement Miata Shock ReplacementSubmitted by Robert "JTBob" Holland Front Shock ReplacementYou'll need 14 mm and 17 mm wrenches, 14 and 17 mm sockets (short and deep sockets), a torque wrench that goes up to 85 lb-ft, spring compressor, 4 jack stands, 2 floor jacks (Miata scissors jack will work), various length socket extensions, 4 new Miata shock dust boots, and a couple of long, flat-blade screwdrivers. Loosen the lug nuts on all four tires. Put the car up on the jack stands and remove all four tires. From the engine compartment, loosen the outer shock nuts (14 mm) and loosen the top shock nut (14 or 17 mm). Do not remove these nuts yet, just loosen. From underneath, remove the upper end-link bolts that attaches the end-link to the anti-roll bar from both sides of the bar. Then on one side, look at the lower A-arm (where the bottom of the shock sits). Remove the 17 mm bolt that runs through the bottom of the shock. Push down on the hub so that the lower A-arm drops away from the bottom of the shock, then push a screwdriver through the hole where the bolt just came out so that when you release the hub, the bottom of the shock will sit on the blade of the screwdriver. 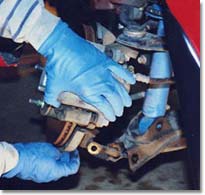
Now look into the lower A-arm space where the bottom of the shock was just located. You'll see a 17 mm bolt that goes vertically down into the lower A-arm. This bolt holds the tongue from the hub carrier into the lower A-arm. Remove that bolt. Now push down on the hub, remove the screwdriver and let the bottom of the shock goes back into the lower A-arm. Now remove the 17 mm bolt (horizontal) that holds the hub carrier to the lower A-arm (closer to you than the lower shock bolt). With that out, you can now pull the hub away from the lower A-arm. 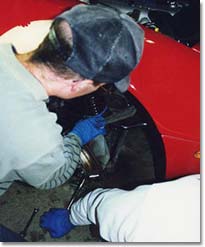
Now both upper and lower A-arms are separate. You can see the tongue on the hub carrier where that vertical bolt went into. Now from the engine compartment, remove the two 14 mm outer nuts. Now comes the tricky part. I usually use a breaker bar and slide it into the space where the hub carrier tongue came out of the lower A-arm. You can step on that bar and lever the lower A-arm down. Then push down on the upper A-arm and try to lift the shock assembly up and away from the lower A-arm. The reason it is tricky is that you don't want to bang the top of the shock assembly into the fender or yourself. You might have to press down on the upper A-arm firmly so that you can swing the upper part of the shock assemby toward you and out of the wheel well. 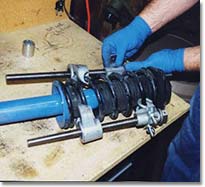
Now use the spring compressor, compressing each side a little bit at a time (don't want it to bind). Be sure to use the safeties while using the compressor as a compressed spring has a lot of energy that can be lethal. With the spring compressed, remove the top shock nut and lift off the top shock mount (be sure to save the nylon gasket when putting it back together). Lift the spring away from the shock and you are now ready to reassemble. Put a new dust boot on new shock, spring on the shock, and place the top shock mount on top of the shock/spring (if you got adjustable shocks, you'll need to drill the top shock mount and new dust boot ring so the larger diameter shock shaft will fit). Put the top shock nut back on the shock to hold the assembly together (just snug it down, don't try to tighten). Put the nylon gasket back on top of the top shock mount, and remove the spring compressor. 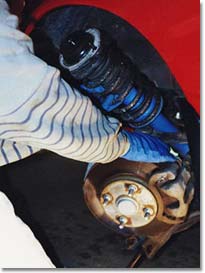
Now put the shock back on the car using the reverse order. With the shock assembly back in place, put the two 14 mm nuts back on top to hold the top shock mount in place. Slide the tongue on the hub carrier back into the lower A-arm and replace the 17 mm bolt (long horizontal) that hold it in place and snug it down. Push down on the hub so you can slide the screwdriver back into the lower A-arm shock hole so that the bottom of the shock sits on top of the blade when you release the hub. Use a flat-blade screwdriver just underneath the bottom of the tongue so you can lever it upward. This will allow you to put the 17 mm (vertical, short) bolt back into place. Without the tongue levered upwards, you'll never get that 17 mm bolt back into place. You'll need to push the screwdriver in a little ways until you can see the tip of the blade through the hole where that bolt will go. With that bolt back in place, torque it down to 65 lb-ft (this will be the only bolt torqued until the end). Pull out the screwdriver and seat the bottom of the shock back into the lower A-arm and replace the 17 mm bolt (horizontal) holding the shock to the lower A-arm. Now do the other front shock assembly the same way. Reattach the upper end-links to the anti-roll bar using the 14 mm nuts and bolts. When done, place a floor jack under each of the lower A-arms (near the edge but not right on the edge). Jack up each A-arm so that the car rises about 1 inch off the front floor jacks (NO more than that). This now compresses each shock assembly so that the bolts will be torqued in the car's natural state. Now torque each side lower shock bolt to 65 lb-ft (horizontal), torque each side lower hub carrier bolt to 65 lb-ft (horizontal), torque each side upper end-link bolt to 35 lb-ft. From the engine compartment, torque each side outer shock mount nuts to 30 lb-ft, and torque the upper shock nut (center) to 25 lb-ft. It you had to drill out the upper shock mount because of adjustable shocks, then you may not be able to get this torque because the shock shaft may spin around. Try to get as much as you can (15 lb-ft should be the minimum). Release the floor jacks and you are done with the front shocks. Rear Shock ReplacementIn the trunk remove the metal plate from the driver's side to expose the upper shock mount nuts. Remove the upper (outer) shock mount nuts. Loosen the upper (center) shock nuts. The driver's side may be a pain-in-the-ass because of the fuel filler hoses. That's where the socket extensions come in handy. Remove the 14 mm bolts from the upper end-links. 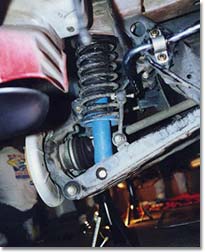
Remove the 17 mm bolt holding the bottom of the shock to the lower A-arm. Step on the hub studs to lower the A-arm assembly and pull out the shock assembly. You may need someone else present who has considerable mass. It can be very difficult to get the A-arms down far enough to get the shock assembly out. Once out, follow the procedure above for spring/shock disassembly. Don't forget the nylon gasket before putting the shock assembly back into place! With the shocks back into place, put the upper shock mount nuts (14 mm) back on, replace the 17 mm lower A-arm bolt. The the other side the same way. With both sides done, replace the 14 mm upper end-link bolts. Use the floor jacks under each lower A-arm to compress and raise the car 1 inch off the rear floor jacks. Torque each side lower shock bolt to 65 lb-ft, torque each side upper end-links to 35 lb-ft. From the trunk, torque the upper (outer) shock mount nuts to 30 lb-ft, and torque the upper (center) shock nut to 25 lb-ft. Lower car back onto jack stands. Put tires back on. Put car back on the ground. Torque lug nuts to 80-85 lb-ft and go for a test drive. DisclaimerPlease note that these tips and pointers are not reviewed or approved by Mazda Motor Corporation or any other corporation or entity other than the originator. The San Diego Miata Club does not accept any liability for damage or injury as a result of utilizing these tips and pointers. Please use common sense and always remember safety first. |
|